
Following our exploration of
The Golden Ratio, my Professor assigned us a task where we would need to take 3, 5, or 7 cubes that were proportional in Golden Ratio to one another, and place them in a way that was reflected Golden Proportion as well. Of course, being a bit of a nut about architecture, I'd already started thinking about this project before it got assigned, because there was a brief mention of it on the syllabus. My original concept was actually to have 2 Golden Ratio cubes intersecting, so that together they formed the footprint of a larger cube, and that the intersection between the two formed two other cubes of golden ratio at the corners. That would be a total of 5 cubes formed. In my head it worked beautifully. I started with a 1" cube, and did exact measurements to determine what the size of each cube would be...
1"
1 5/8"
2 5/16"
3 3/4"
6 1/8"
Then I fired up
Google Sketchup and began to arrange the two cubes to fit in the larger third, and suddenly realized what an entire paper on the Golden Mean should have taught me: Two Golden Ratio Cubes (GRCs) forming a third larger one in GR
will not intersect with one another.
Oops.
I was going to abandon the idea in favor of something simpler. Then I thought, "why not just work with the mistake and learn from it?"

So I did. I created a third, smaller cube in GR to the smallest, and figured out that I could not only use it to connect and intersect with both main cubes, but that it formed two smaller GRCs in the intersection. Perfecto! And it made a total of 7 cubes, even better! All I needed to do was adjust my sizes, the 2 largest GRCs would up the ante a bit.
1"
1 5/8"
2 5/16"
3 3/4"
6 1/8"
9 15/16"
16 1/16"
I finally created sketches to illustrate the idea. It had a little supporting column in back that would intersect the rear cube to create the 1".

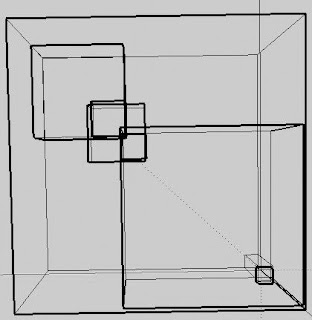

It should be noted that my skill with Google Sketchup is minimal at best, so that's why the sketches are so messy. But they conveyed the basic idea and would serve as fine references for the purposes of measurement. I sent an email containing the plans and concept idea to the Professor and hopped in the car. It was time to go buy the materials.

I figured this would be perfect. I'd use floral wire to create the cubes in wireframe, and then wrap them with 3 different primary colors in cellophane. The overlapping cellophane colors would in turn create a new color, like orange, purple, or green when they formed a cube. It would be a brilliant experiement in light. w00t!
It seemed quite simple in my head.

In reality, it was not nearly so simple. The first two hours were spent wondering how to get the floral wires to connect to one another. I eventually figured out I could twist and braid them together but it was a slow process that yielded messy results.

The first cube should have been my indicator that this could not end well for me. But I figured any bends and messes in the model would slowly resolve themselves once I tightened up the connections, wrapped on the cellophane, and snipped off the corner bits... sure, sure. I continued working...

I truly hate it when Picasa Web server rotates the images automatically. Anyway, it's not important... the finished wireframe looked like crap, and it was going on 8 hours since I'd laid out the materials. Still, I stubbornly pressed on, having hit that stage of not caring, rather I just wanted the thing to be over and done with.

I think this part gave me a little hope. Even though the wires looked like crap, the cellophane effect was pretty cool... at first.

Again, Picasa Web server rotates my photo for me. I hate you, Picasa. Anyway, the effect of the cellophane worked about as well as a raw potato put into in a soup with too much salt. It doesn't make the soup taste any better, but at least at the end of 11 hours, I felt like I'd actually tried my best, even though I wasn't finished. It was awful. I was ashamed of what it looked like, but at least the theory from paper had been proven as possible. But the difference between proving a concept and demonstrating it professionally is the difference between "reciting a hilarious joke verbatim in monotone to the blank stares of coworkers" and "bringing down the house at the Apollo." Sunday closed with me trudging off to bed, knowing the project would be due Thursday, and that I would be turning in a massive disappointment as my first major project.
Monday, the plans I'd sent to the Professor were replied to. She wanted to discuss the project with me. I met with her after class and she gave several helpful suggestions that I'd fervantly wished I'd gotten before I started the project. Still... her advice gave me new inspiration and ideas, and I realized that my biggest failure on the project had not been in the concept, or even technically the implementation, but in the materials.
Floral wire SUCKS for making cubilinear structures that are supposed to support themselves. The Dernier strength is such that it will barely even support itself and it does so with a telltale curve under the gravity of its own weight. It's difficult to cut, because the wirecutters don't cut string well, and scissors won't cut wire, so you have to use two tools for every cut. And the only way to join it to itself is to braid it with messy pigtails that, when you snip them, result in the joining between two separate wires to be lost.
I realized what I needed was a material that was easy to cut, easy to measure, can structurally support itself well, and is already a level plane. It needed to be light and relatively cheap. And since it was about ten o'clock on a Monday night, it needed to be able to be bought at Wal-Mart.
FOAMBOARD!!!
I arrived back home around 11 PM with several rolls of scotch tape, several sheets of black foamboard, white foamboard, and some red posterboard. This time I didn't even mess with the camera and trying to document my steps. I was a man on a mission.
I used the same concept for the plans but made a few adjustments. Since the cubes would no longer be transparent, they would have to be implied by their footprint. Since the "cutaway" view was allowed, I could use vertical walls for the largest cube as support for the two "floating cubes".
Best of all, the Professor recommended I simply use a Fibonacci sequence for the GRCs rather than the exact measurements I had before. This made measuring considerably easier, since the smallest unit I had to worry about now was 1/4" (the thickness of my foamboard). My new measurements were now:
1"
2"
3"
5"
8"
13"
21"
When the final piece had been slid into place, I stepped back and looked at the clock, 5:45 AM, Tuesday morning. I then grabbed the camera and snapped some photos.


It looked kind of like a Chocolate Sundae. Vanilla ice cream, chocolate sauce, and a cherry on top. Since there were seven cubes altogether, I called it "Seven to Sundae". I then went and laid down for an hour's worth of sleep before going to work.
I brought it in Tuesday evening for class and the Professor examined it for some time, pleased with the work, said it was adequate for the task, and then challenged me to improve upon it by taking the central floating cube that intersects the two, and rotating it 45 degrees to make the interaction more dynamic. Then the head of the architectural department at the college was asked for his opinion by the Professor, and they began to argue about it. The Head felt it was fine the way it was, that the cubilinear expression of it would be ruined by rotating it 45 degrees, whereas the Professor felt it would be too static if left in its present condition. Both agreed the central cube should have been black.
This got the class itself into a debate from everything about adding a staircase made of GRCs to making the central cube red instead of black or white, to changing the placement of the red cube...
We finally decided upon two things:
First, we would test the concept of making the central cube black first. I've already been envisioning how I would do this, and I believe it can be done with a minimal amount of effort (at least compared to the rest of the structure.
The second thing we decided was that the little red cube should be an interactive part of the model. It can be picked up and rolled, like dice, in any of the other cubes to create a dynamic and contrasting effect.
The 45-degree rotation may still happen, which I'm fine with now. At the time I was horrified at the prospect of tearing apart the whole model to fix one thing that, had I known the new request initially, could have been incorporated into the original design. But that's not the point. The Professor's intent was to, early on, break me of the habit of falling in love with my design. It was also to see if I could rise to the challenge I will regularly face in the business world where you prepare the world for the client on a silver platter and they say "Meh... I don't like this part. Change it." I take her challenge as both a compliment and a new possible way to see the evolution of a concept take on new form.
This morning I loaded up the rest of my foamboard tape, razor, etc, into the car. I'll be bringing them up to the college tonight to see what we can make of this. I also brought the camera. Hopefully I'll have some good photos of the result.


 decorative bamboo furniture lighting-traditional home decor
 decoration continues to leave its mark. Modern processing methods, it can be converted to any room in your home, you can incorporate bamboo products in every room as well. It is covered or window, decorated the walls of the bamboo, bamboo flooring and furniture is, bamboo products, you add a charming look to the interior. Bamboo products also, to complement the decor of the house of Africa. Right touch of intrigue and adventure, you can convert any indoor and outdoor space. Bamboo is a beauty that transcends the era very versatile and adaptable. Bamboo is a material one that requires minimal care, and provides a fascinating look into your house yet.
 Bamboo Panels - Bamboo Home Decor
 Bamboo Home Decor Ideas


